How To Change Or Customize Contact Poster On iPhone
In this guide we will show you how you can create and customize a Contact Poster on your iPhone. With these instructions you will be able to create a new Contact Poster and set it on your Contact Poster.
Starting iOS 17 users will get access to a new iPhone feature called Contact Poster. This new feature will enable users to create personalized posters that are displayed to their family and friends on their devices.
Users can create a Contact Poster according to their liking. They can use their favorite photo, a Memoji, or simply a Monogram and even add their preferred font to it.
Once you have created a Contact Poster for yourself, it will appear on your friend’s iPhone as your profile picture in Messages, Contact Card, and in fullscreen whenever you call them.
Apple has built a brand new Contact Poster builder that allows usres to create new posters and customize their existing contact posters. A great thing about this feature is that it allows users to create and store multiple Contact Posters and switch between them whenever they want.
Things to know about Contact Posters
- iOS 17 or later is required for Contacts Posters.
- Your family and friends can only see your Contact Posters if they are also running iOS 17 or later.
- You can create multiple Contact Posters and switch between them whenever you like.
- You can automatically show your Contact Poster to Contacts or decide if you want to display your Contact Poster for each contact by selecting the Always Ask option on Contact Photo & Poster customization page.
- Changes made to your current Contact Poster are automatically updated on your Contact’s devices.
Create and customize Contact Poster on iPhone
Follow these steps to create or edit a Contact Poster on your iPhone or iPad.
Step 1. On your iPhone open the Phone app and tap on the ‘Contacts‘ tab.
Step 2. From the Contacts list page tap on your name from the top.
Step 3. Now tap on Contact Photo & Poster, and then tap on the ‘Edit‘ button.
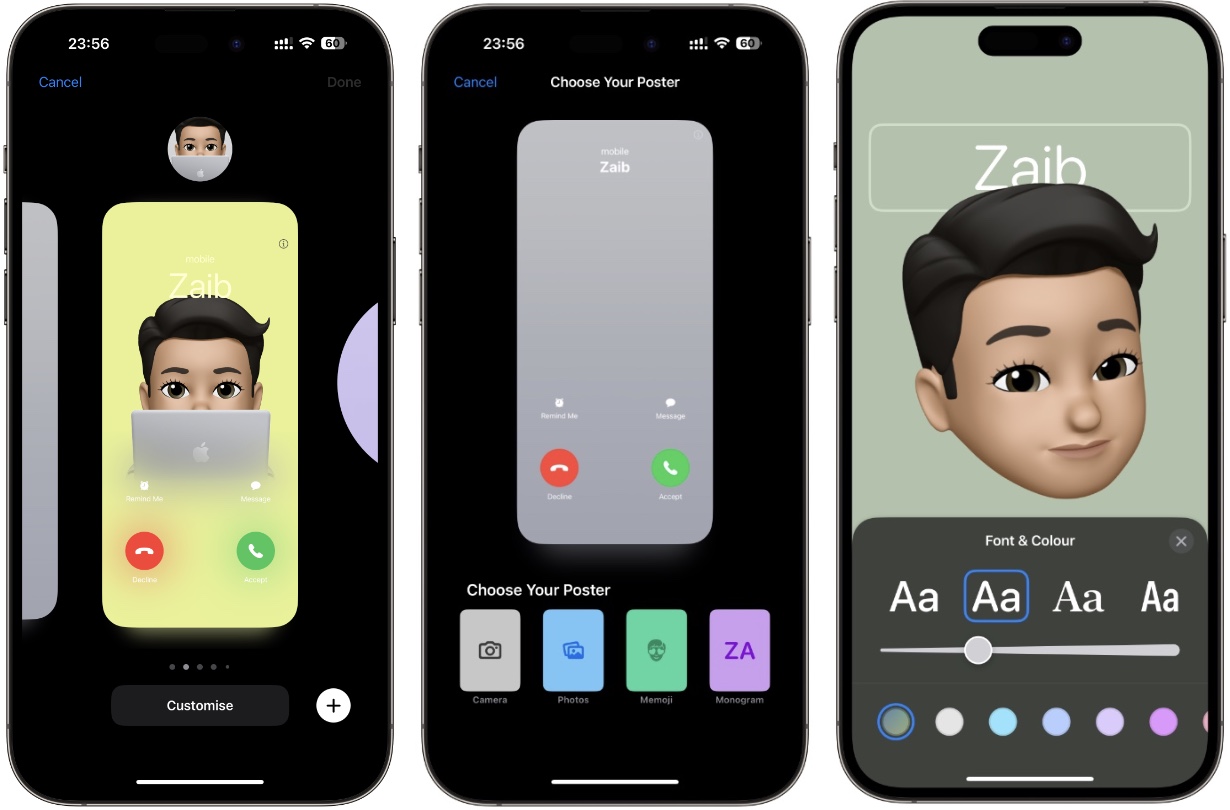
Step 4. To customize an existing Contact Poster tap on ‘Customize‘ button. To create a new one swipe to the right most card and tap on ‘Create New‘ button.
Step 5. On the next page choose between Photos, Memoji, or Monogram options. You can also tap on ‘Camera‘ option to take a fresh photo for your Contact Poster.
Step 6. On the next screen you can tap on various buttons to change the background color, pose for memoji, change font, font color and thickness of the font.
Step 7. After you are done with the customizations of your choice, you can tap on the ‘Done‘ button from the top.
Step 8. On the next screen you will be able to preview your newly created or edit poster. Tap on Back to make more changes or tap on Continue to proceed.
Step 9. Next you can select a contact photo or skip to to choose later.
Step 10. Confirm to use the new Contact Poster with your My Card in Contacts and Apple ID.
There you have it folks, this is how you can create and customize your Contacts Poster in iOS 17 or later.
If you have any questions related to this guide, then let us know in the comments below.


